
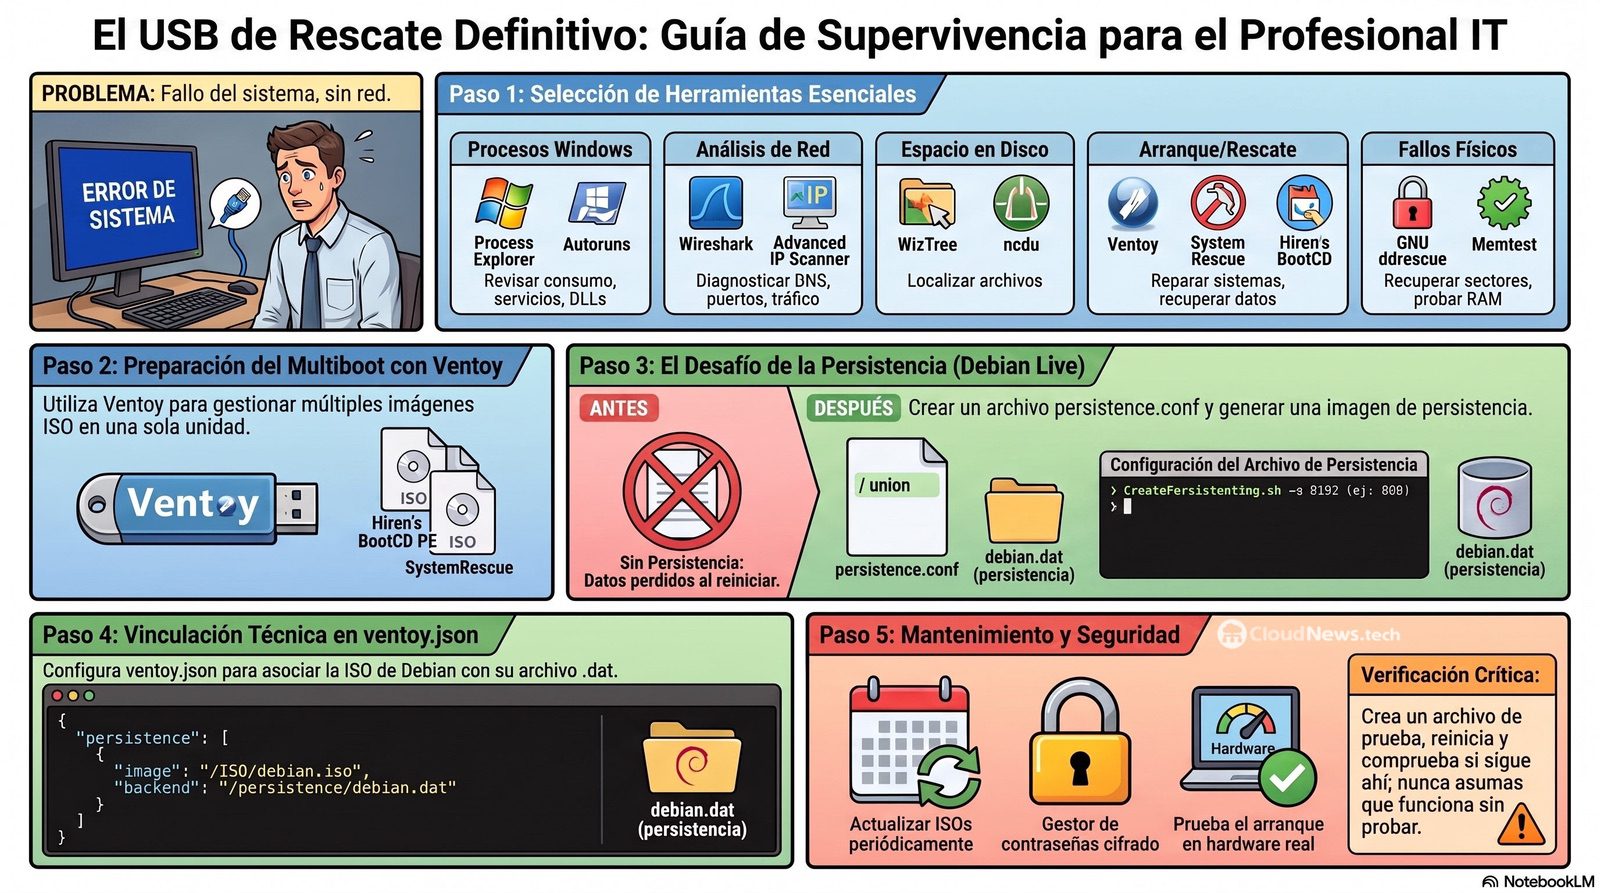
A server that fails to boot, a machine stuck on a blue screen, or a network losing connectivity usually don’t give much time to search for tools, download images, or recall commands. A well-prepared IT emergency kit allows you to start diagnosing from the very first minute, even when the operating system is damaged, there’s no internet access, or the affected device cannot connect to the usual infrastructure.
The Keys to an IT Emergency Kit in 20 Seconds
- A good kit should cover boot, storage, network, hardware, malware, and data recovery.
- Ventoy allows you to gather multiple ISO images on a single USB drive without burning them one by one.
- Copying a Debian Live ISO isn’t enough to preserve changes: persistence requires a data file and an entry in
ventoy.json. - SystemRescue provides tools for partitions, file systems, damaged disks, memory, backups, and networking.
- Utilities should come from official sources and stay up to date.
- Passwords, private keys, and production credentials should not be stored unencrypted.
- The USB should be tested before any actual need, both in UEFI and with Secure Boot when managing devices.
- A second drive for logs, dumps, and backups prevents mixing rescue tools with data from potentially compromised systems.
The first decision isn’t about accumulating dozens of programs. The kit should respond to the incidents each professional is prepared to handle. A Linux sysadmin will need different utilities than a technician mainly working with Windows stations, although both will share tools for disk review, network analysis, and file recovery.
A reasonable selection can combine portable apps for Windows with various boot images. The USB effectively becomes a small toolbox capable of working both within the OS and from an independent environment.
A Useful Kit Must Prioritize Diagnostics Over Program Quantity
The tools listed in this infographic form a practical foundation. Process Explorer allows investigating processes, DLLs, and open files in Windows. Microsoft distributes it as part of Sysinternals and allows running it directly without traditional installation. It’s especially useful for pinpointing which application holds a file locked, distinguishing similar process names, or analyzing unusual resource consumption.
Wireshark handles the network aspect. It can capture and analyze traffic to detect DNS issues, restarting connections, failed negotiations, delays, or unexpected communications. Its usefulness depends on having the program ready, basic filters prepared, and knowing where to perform captures: analyzing the wrong device can give an incomplete incident picture. Always download from the official project site.
WizTree or equivalent tools help identify which directories are consuming storage space. BlueScreenView offers a quick review of Windows memory dumps, while Geek Uninstaller is handy for removing corrupted or poorly uninstalled applications. Advanced IP Scanner swiftly shows accessible devices on a network, but any scanning should be limited to trusted or owned infrastructure.
Hiren’s BootCD PE remains a well-known option to intervene on unbootable Windows systems. Debian Live provides a full Linux environment for mounting volumes, copying info, reviewing logs, or using its tools. Ventoy and Rufus serve related but different functions: Rufus is suited for creating dedicated boot drives, while Ventoy maintains multiple ISO images on one USB port.
A practical organizational layout could look like this:
| Need | Possible Tools | Typical Usage |
|---|---|---|
| Windows process and lock analysis | Process Explorer, Autoruns, Process Monitor | Review resource use, services, drivers, DLLs, persistence |
| Network analysis | Wireshark, TShark, tcpdump, nmap | Diagnose DNS, ports, routes, latency, connections |
| Disk space management | WizTree, du, ncdu | Identify large folders, images, or logs |
| Boot and recovery environment | Ventoy, Rufus, Hiren’s BootCD PE | Start alternative environment when system fails |
| Linux and Windows rescue | SystemRescue, Debian Live | Mount disks, repair filesystems, copy data |
| Damaged disks | GNU ddrescue, smartmontools, TestDisk | Recover readable sectors, check health, rebuild partitions |
| Partitions and volumes | GParted, GNU Parted, LVM | Resize, mount, or recover storage |
| Memory and hardware | Memtest, nvme-cli, SMART tools | Differentiate hardware failures from software issues |
| Malware | Authorized, up-to-date scanners | Scan systems from a clean environment |
| Backups and transfer | rsync, SSH, Samba, NFS | Extract data to secure storage |
SystemRescue deserves a dedicated spot in this set. It’s a bootable Linux environment tailored for maintaining or repairing systems after failures. It supports both Linux and Windows, with filesystems like ext4, XFS, Btrfs, VFAT, and NTFS, and networking resources including Samba and NFS.
Its utilities include GParted, FSArchiver, GNU ddrescue, TestDisk, Memtest, and rsync. From resizing partitions to attempting disk copies with physical errors, restoring partition tables, testing memory, or transferring data. Its documentation also covers recovering data from unbootable Windows systems, PXE booting, automated scripts, and creating persistent spaces to retain changes.
Not every operation should start with disk writing. When physical failure signs appear, priority is to clone sectors from readable areas and operate on that image. Running aggressive repairs directly on the only available device can worsen a recovery that was still possible.
Debian Live Persistence with Ventoy Requires More Than Just Copying the ISO
A common mistake occurs when using Ventoy with Debian Live. The ISO boots correctly, lets you install packages, and modify files, but all changes disappear after reboot. Many assume persistence is broken, but in reality, it was never properly configured.
As David Carrero explains, copying the ISO to the USB only handles booting. Ventoy needs a dedicated file acting as persistent storage and an entry linking it to the ISO.
The first step is creating a persistence.conf file with a single line:
/ union
Then, you can use Ventoy’s official script CreatePersistentImg.sh to generate the persistence file. For example, for an 8 GB image:
printf '/ union\n' > persistence.conf

sudo bash CreatePersistentImg.sh \
  -s 8192 \
  -l persistence \
  -c persistence.conf
The -s option sets size in MB, -l persistence assigns the expected label, and -c persistence.conf embeds the config into the image. Ventoy’s documentation explicitly states that distributions like Debian, Kali, and Clonezilla require a file with the line / union.
The generated file can be copied, for instance, to:
/persistence/debian-live.dat
The ISO might be located at:
/ISO/debian-live.iso
Next, declare the association in /ventoy/ventoy.json:
{
  "persistence": [
    {
      "image": "/ISO/debian-live.iso",
      "backend": "/persistence/debian-live.dat"
    }
  ]
}
Ventoy supports one or multiple persistence files per ISO, can show a menu before boot, or automatically select a configured space. Ensure the persistence file is on the first partition of the USB and run sync after copying to physically write data to disk.
Test persistence easily: add a file in your home directory, install a small utility, reboot, and verify the change persists. Trusting persistence without testing risks discovering issues during an actual incident.
Also, watch disk space. Logs, packages, and captures can quickly fill a 1-2 GB file. Ventoy has scripts to expand existing persistence images, but shrinking without data loss is typically limited to ext4 files.
Update, Verify, and Manage Credentials Separately
An emergency kit ages over time. A ISO downloaded two years ago might not recognize recent hardware, contain outdated tools, or lack support for newer filesystems. Routine updates—downloading new versions, verifying hashes, testing bootability, and removing unused tools—are crucial.
Credentials deserve special handling. Saving plain-text passwords for hypervisors, VPNs, switches, or servers on the USB turns a rescue tool into a potential security risk. It’s better to use encrypted password managers, temporary credentials, or controlled emergency accounts with activity logs and rotation policies.
Avoid connecting the only write-enabled tool memory to unknown or suspicious computers. A safer approach involves carrying two drives: one for booting and running tools, and another encrypted for logs, dumps, or temporary copies. When hardware permits, physical write protection adds an extra layer of security.
Enhance your preparation with offline documentation: management addresses, recovery procedures, commands for reconstructing RAID or LVM, network diagrams, and escalation contacts. During widespread outages, internet access, document management systems, and cloud services might be unavailable.
Preparation extends beyond tool copying. Test boot on different devices, verify keyboard and network functionality, check NVMe and controllers, practice mounting encrypted volumes, and confirm backups reach their targets. When every moment counts, the key difference is knowing which tools work and how to use them effectively without increasing the damage.
Frequently Asked Questions
How much capacity should an IT emergency USB have?
A 64 GB drive may suffice for several ISOs and portable tools. To include persistence, installers, drivers, and documentation, 128 GB provides more headroom.
Does Ventoy automatically save changes with Debian Live?
No. You must create a persistence file with proper configuration and associate it in /ventoy/ventoy.json.
Can SystemRescue only repair Linux?
No. It can boot on Linux and Windows devices, mount NTFS partitions, recover data from unbootable systems, and work with multiple storage formats.
Is it safe to store passwords on the same USB?
Not in plain text. Credentials should be encrypted, and whenever possible, replaced with temporary or controlled emergency access accounts.
Sources:
- Ventoy, official persistence plugin documentation.
- SystemRescue, description, documentation, and included tools.
- Microsoft Sysinternals, official documentation for Process Explorer.
- Wireshark Foundation, official download page and docs.
